Thursday, February 24, 2011

How to use Qstackedwidget in Qt (Switching between multiple views in Qt)


Hi all today we shall see about how to use stackedwidget in QT.

You might have confusion that how to handle mutiple views in QT?, for example you are in an inbox widget and you will switch to message widget. How to handle this sort of situations? you may think that hiding the inbox widget and going to message widget or delete the inbox widget and recreate it after coming back from message widget.But this could be a temporary solution not the better approach,the better approch is to use Qt Stackedwidget.

The concept is very simple, when you are in one widget and you will switch to another widget just push the current widget into stack and proceed to next widget, when you are coming back to the previous widget just delete the current widget and pop up the previous widget from the stack.

Most of Qt apps will have a Mainwindow and formed with multiple widgets, Mainwindow has menubar,when you switch to any widget just delete the current menu actions form window and load it with the new actions from widget. so if you do like this then, you always have a single class which is derived from "Qmainwindow" thought the application.

In mainwindow itself, you need to handle all the possibalities like when setting back menu,setting exit or is exit required throught application and many other things depending on your requirements.

Here is the simple example i have created which demonstrate how to use stackedwidget in QT.
in this i would like to explain few mainwindow functions which may be usefull.

"Qt_Stackwidget::activeWidgetChanged(int index)"--->; This gets called when the new widget is created with index of it, so clear the window menu bar and load it with new menus assosiated with new widget

"Qt_Stackwidget::changeCBA(QBaseWidget* current)"--->; This is for adding the back or exit based on the widget type, for example in first widget you should keep exit or else back would be preffered.

"Qt_Stackwidget::activatePerviousView()"--->;This is for activating the previous view by deleting the current one when you hit back menu.

Here is the simple source code, i have created widgets & view switching logic in the single file itself ,you can split it to multiple and use it accordingly.

Qt_Stackwidget.cpp
//Qt-articles.blogspot.com
#include "Qt_Stackwidget.h"

Qt_Stackwidget::Qt_Stackwidget(QWidget *parent)
    : QMainWindow(parent)
{
    //ui.setupUi(this);
    back = NULL;
    stack = new QStackedWidget();
    QObject::connect(stack, SIGNAL(currentChanged(int)),this, SLOT(activeWidgetChanged(int)));
    stack->addWidget(new Homewidget(stack));
    setCentralWidget(stack);
}

Qt_Stackwidget::~Qt_Stackwidget()
{

}
//when new widget is inserted to stack
void Qt_Stackwidget::activeWidgetChanged(int index)
    {
    // Current widget changed, we use menubar of the new widget
    QBaseWidget* current = static_cast<QBaseWidget*>(stack->widget(index));
    //changeCBA(current);
    if (current)
        {
        // NOTE: need to set focus for the active widget. 
        // Enviroment search CBA buttons from the active widget and use these.
        // CBA buttons for the active focused widget is set in changeCBA()
        current->setFocus();
        // Update menubar of the QMainWindow
        QMenuBar* menubar = this->menuBar();
        menubar->clear();
        for (int i=0;i<current->GetMenuBar()->actions().count();i++)
            {
            QAction *act = current->GetMenuBar()->actions()[i];
           
            menubar->addAction(act);
            }
        createBaseMenu();
        }
    // Set correct CBA buttons for the active widget
    changeCBA(current);
    }
//Qt-articles.blogspot.com
void Qt_Stackwidget::createBaseMenu()
    {
    // All widgets in QStackedWidget have this exit menu item
    menuBar()->addAction("Exit",this,SLOT(close()));
    }

void Qt_Stackwidget::changeCBA(QBaseWidget* current)
    {
    if (current)
        {
        QString classname = current->metaObject()->className();
        if(back != NULL)
           {
                  delete back;
                 back = NULL;
           }
        if (classname == "Firstwidget" || classname == "Secwidget" || classname == "Thiredwidget")
            {
            // Change Back left softkey for QMyWidget2 and QMyWidget3
            createOptionsBackCBA(current);
            }
        else
            {
            // rest have Exit left softkey
            createOptionsExitCBA(current);
            }
        }
    }

void Qt_Stackwidget::createOptionsExitCBA(QWidget* current)
    {
    
    back = new QAction("Exit", this);
    back->setSoftKeyRole(QAction::NegativeSoftKey);
    QObject::connect(back, SIGNAL(triggered()), this, SLOT(close()));
    this->addAction(back);
 
    }
//Qt-articles.blogspot.com
void Qt_Stackwidget::createOptionsBackCBA(QBaseWidget* current)
    { 
    // Create exit right CBA
    back = new QAction("Back", this);
    back->setSoftKeyRole(QAction::NegativeSoftKey);
    QObject::connect(back, SIGNAL(triggered()), this, SLOT(activatePerviousView()));
    this->addAction(back);
    }

int Qt_Stackwidget::activatePerviousView()
    {
    int ret = -1;
    QString currentName = stack->currentWidget()->metaObject()->className();
    QString previous;
    
    int count = stack->count();
    for (int i=stack->count()-1;i>=0;i--)
        {
        QWidget* w = stack->widget(i);
        if (w->metaObject()->className()==currentName)
            {
           
                {
                i--;
                previous = stack->widget(i)->metaObject()->className();
                ret = 0;            
                stack->setCurrentWidget(stack->widget(i));
                stack->removeWidget(w);
                delete w;
                // Activate prevous widget
                //activateWidget(previous);
                }
            break;
            }
        }
   return ret;
    }

Homewidget::Homewidget(QStackedWidget* stackedWidget,QWidget *parent)
    : QBaseWidget(parent)
{
    //Create 3 Buttonss
    BaseStackwidget = stackedWidget;
    widget1 = new QPushButton("Create message");
     QObject::connect(widget1,SIGNAL(clicked()),this, SLOT(CreateFirstwidget()));
    widget2 = new QPushButton("Inbox");
     QObject::connect(widget2,SIGNAL(clicked()),this, SLOT(CreateSecwidget()));
    widget3 = new QPushButton("Outbox");
     QObject::connect(widget3,SIGNAL(clicked()),this, SLOT(CreateThiredwidget()));
    
    createMenus();
    //Add the widget to layouts
    layout = new QVBoxLayout();
    layout->addWidget(widget1);
    layout->addWidget(widget2);
    layout->addWidget(widget3);
    setLayout(layout);
}

Homewidget::~Homewidget()
{

}
//Create the first widget
void Homewidget::CreateFirstwidget()
    {
    Firstwidget *first= new Firstwidget(BaseStackwidget);
    BaseStackwidget->addWidget(first);
    BaseStackwidget->setCurrentWidget(first);
    }
//Create the sec widget
void Homewidget::CreateSecwidget()
    {
    
    Secwidget *sec= new Secwidget(BaseStackwidget);
    BaseStackwidget->addWidget(sec);
    BaseStackwidget->setCurrentWidget(sec);
    }
//Create the thired widget
void Homewidget::CreateThiredwidget()
    {
    Thiredwidget *thiredwid = new Thiredwidget(BaseStackwidget);
    BaseStackwidget->addWidget(thiredwid);
    BaseStackwidget->setCurrentWidget(thiredwid);
    }

QMenuBar* Homewidget::GetMenuBar() const
    {
      return menuBar;
    }
//Qt-articles.blogspot.com
void Homewidget::createMenus()
    {
    // Create menubar for this widget
    // We sets these menu items into into QMainWindow menu when this widget is active
    menuBar = new QMenuBar();

    FirstwidgetAction = new QAction("Create message",menuBar);
    menuBar->addAction(FirstwidgetAction);
    connect(FirstwidgetAction, SIGNAL(triggered()),this, SLOT(CreateFirstwidget()));

    SecwidgetAction = new QAction("Inbox",menuBar);
    menuBar->addAction(SecwidgetAction);
    connect(SecwidgetAction, SIGNAL(triggered()),this, SLOT(CreateSecwidget()));

    ThiredwidgetAction = new QAction("Outbox",menuBar);
    menuBar->addAction(ThiredwidgetAction);
    connect(ThiredwidgetAction, SIGNAL(triggered()),this, SLOT(CreateThiredwidget()));
    }

Firstwidget::Firstwidget(QStackedWidget* stackedWidget,QWidget *parent)
    :QBaseWidget(parent)
{
    BaseStackwidget = stackedWidget;
    widget2 = new QPushButton("Text Message");
    bool val = QObject::connect(widget2,SIGNAL(clicked()),this, SLOT(CreateSecwidget()));
    widget3 = new QPushButton("Multimedia Message");
    QObject::connect(widget3,SIGNAL(clicked()),this, SLOT(CreateThiredwidget()));
         
    createMenus();
     
    layout = new QVBoxLayout();
    layout->addWidget(widget2);
    layout->addWidget(widget3);
        
    setLayout(layout);
}

void Firstwidget::CreateSecwidget()
    {
    Secwidget *sec= new Secwidget(BaseStackwidget);
    BaseStackwidget->addWidget(sec);
    BaseStackwidget->setCurrentWidget(sec);
    }
//Qt-articles.blogspot.com
void Firstwidget::CreateThiredwidget()
    {
    Thiredwidget *thired= new Thiredwidget(BaseStackwidget);
    BaseStackwidget->addWidget(thired);
    BaseStackwidget->setCurrentWidget(thired);
    }

void Firstwidget::createMenus()
{
    menuBar = new QMenuBar();
        
    SecwidgetAction = new QAction("Text Message",menuBar);
    menuBar->addAction(SecwidgetAction);
    connect(SecwidgetAction, SIGNAL(triggered()),this, SLOT(CreateSecwidget()));

    ThiredwidgetAction = new QAction("Multimedia Message",menuBar);
    menuBar->addAction(ThiredwidgetAction);
    connect(ThiredwidgetAction, SIGNAL(triggered()),this, SLOT(CreateThiredwidget()));
}

QMenuBar* Firstwidget::GetMenuBar() const
{
    return menuBar;
}

Secwidget::Secwidget(QStackedWidget* stackedWidget,QWidget *parent)
    :QBaseWidget(parent)
{
    BaseStackwidget = stackedWidget;
    widget3 = new QLabel("You are in the last screen, plese press back to go to previous screen");
        
    bool val = QObject::connect(widget3,SIGNAL(clicked()),this, SLOT(CreateThiredwidget()));
         
    createMenus();
    layout = new QVBoxLayout();
    layout->addWidget(widget3);    
    setLayout(layout);
        
}
//Qt-articles.blogspot.com
void Secwidget::CreateThiredwidget()
{
    Thiredwidget *thired= new Thiredwidget(BaseStackwidget);
    BaseStackwidget->addWidget(thired);
    BaseStackwidget->setCurrentWidget(thired);
  //add the code to create thired widget, and with menu exit and right back
}

void Secwidget::createMenus()
{
    menuBar = new QMenuBar();
        //connect(menuBar, SIGNAL(triggered()),this, SLOT(CreateThiredwidget()));
    //ThiredwidgetAction = new QAction("Thired Widget",menuBar);
    //menuBar->addAction(ThiredwidgetAction);
    
}

QMenuBar* Secwidget::GetMenuBar() const
{
    return menuBar;
}

Thiredwidget::Thiredwidget(QStackedWidget* stackedWidget,QWidget *parent)
    :QBaseWidget(parent)
{
    BaseStackwidget = stackedWidget;
    thiredwidgetLabel = new QLabel("You are in the last screen, plese press back to go to previous screen");
    createMenus();
    layout = new QVBoxLayout();    
    layout->addWidget(thiredwidgetLabel);
    setLayout(layout);    
}

void Thiredwidget::createMenus()
{
    menuBar = new QMenuBar();
    //connect(menuAction2, SIGNAL(triggered()),this, SLOT(createWidget2()));
}

QMenuBar* Thiredwidget::GetMenuBar() const
{
    return menuBar;
}


Qt_Stackwidget.h
//Qt-articles.blogspot.com

#include <QtGui/QMainWindow>
#include "ui_Qt_Stackwidget.h"
#include <QtGui>

class QBaseWidget;

class Qt_Stackwidget : public QMainWindow
{
    Q_OBJECT

public:
    Qt_Stackwidget(QWidget *parent = 0);
    ~Qt_Stackwidget();
    void createBaseMenu();
    void changeCBA(QBaseWidget* current);
    void createOptionsBackCBA(QBaseWidget* current);
    void createOptionsExitCBA(QWidget* current); 
    QAction* back;
    
    public slots:
    int activatePerviousView();


public:
    Ui::Qt_Stackwidget ui;
    QStackedWidget *stack;
    
private slots:
    void activeWidgetChanged(int index);
};

class QBaseWidget : public QWidget
    {
    Q_OBJECT

    public:
        QBaseWidget(QWidget *parent = 0)
            {
        
            }
        virtual ~QBaseWidget()
            {
            
            }

    public:
       
        // Returns widget menu
        virtual QMenuBar* GetMenuBar() const=0;

        // Exit from the app        
    protected:
        // Widget own menubar
        QMenuBar*           menuBar;
        
        // Pointer to QStackedWidget where all views exists
        QStackedWidget*     BaseStackwidget;
    };

class Homewidget : public QBaseWidget
    {
     Q_OBJECT

    public:
     Homewidget(QStackedWidget* stackedWidget,QWidget *parent = 0);
        ~Homewidget();
        
        QMenuBar* GetMenuBar() const;
        void createMenus();
        
                
   public slots:
        void CreateFirstwidget();
        void CreateSecwidget();
        void CreateThiredwidget();

    private :
        QMenuBar *menuBar;
        QPushButton *widget1;
        QPushButton *widget2;
        QPushButton *widget3;
        QVBoxLayout *layout;
        
        QAction *FirstwidgetAction;
        QAction *SecwidgetAction;
        QAction *ThiredwidgetAction;
      
    
    };
//First widget class
class Firstwidget : public QBaseWidget
    {
     Q_OBJECT

    public:
     Firstwidget(QStackedWidget* stackedWidget,QWidget *parent = 0);
        ~Firstwidget()
            {
            
            }
        
        QMenuBar* GetMenuBar() const;
        void createMenus();
        
   public slots:
        void CreateSecwidget();
        void CreateThiredwidget();

    private :
        QMenuBar *menuBar;
        
        QPushButton *widget2;
        QPushButton *widget3;
        QVBoxLayout *layout;
        
        QAction *SecwidgetAction;
        QAction *ThiredwidgetAction;
    
    };
//Second widget class
class Secwidget : public QBaseWidget
    {
     Q_OBJECT

    public:
     Secwidget(QStackedWidget* stackedWidget,QWidget *parent = 0);
        ~Secwidget()
            {
            
            }
        
        QMenuBar* GetMenuBar() const;
        void createMenus();
        
   public slots:
        //void CreateSecwidget();
        void CreateThiredwidget();

    private :
        QMenuBar *menuBar;
        
        QLabel *widget3;
        QVBoxLayout *layout;
        QLabel *thiredwidgetlabel;
        
        QAction *ThiredwidgetAction;
    
    };

class Thiredwidget : public QBaseWidget
    {
     Q_OBJECT

    public:
     Thiredwidget(QStackedWidget* stackedWidget,QWidget *parent = 0);
        ~Thiredwidget()
            {
            
            }
        QMenuBar* GetMenuBar() const;
        void createMenus();
        
    private :
        QMenuBar *menuBar;
        QVBoxLayout *layout;
        QLabel *thiredwidgetLabel;
    };
#endif // QT_STACKWIDGET_H

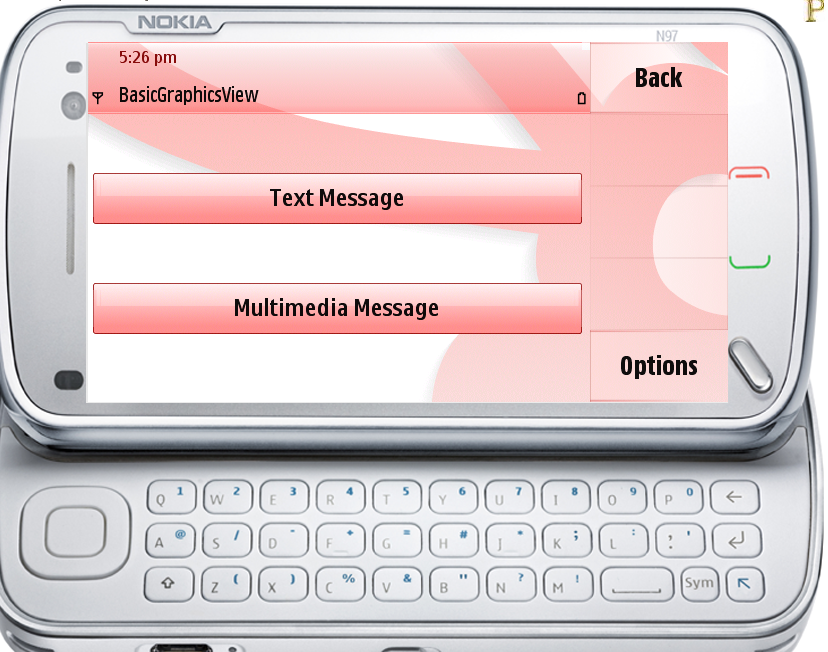
Some of the screenshots of output.


Thursday, February 10, 2011

Nokia CEO Stephen Elop's letter to Nokia employees


Here is the Letter from Nokia CEO to there employees


Hello there, 

There is a pertinent story about a man who was working on an oil platform in the North Sea. He woke up one night from a loud explosion, which suddenly set his entire oil platform on fire. In mere moments, he was surrounded by flames. Through the smoke and heat, he barely made his way out of the chaos to the platform's edge. When he looked down over the edge, all he could see were the dark, cold, foreboding Atlantic waters. 

As the fire approached him, the man had mere seconds to react. He could stand on the platform, and inevitably be consumed by the burning flames. Or, he could plunge 30 meters in to the freezing waters. The man was standing upon a "burning platform," and he needed to make a choice. 

He decided to jump. It was unexpected. In ordinary circumstances, the man would never consider plunging into icy waters. But these were not ordinary times - his platform was on fire. The man survived the fall and the waters. After he was rescued, he noted that a "burning platform" caused a radical change in his behaviour. 

We too, are standing on a "burning platform," and we must decide how we are going to change our behaviour. 

Over the past few months, I've shared with you what I've heard from our shareholders, operators, developers, suppliers and from you. Today, I'm going to share what I've learned and what I have come to believe. 

I have learned that we are standing on a burning platform. 

And, we have more than one explosion - we have multiple points of scorching heat that are fuelling a blazing fire around us. 

For example, there is intense heat coming from our competitors, more rapidly than we ever expected. Apple disrupted the market by redefining the smartphone and attracting developers to a closed, but very powerful ecosystem. 

In 2008, Apple's market share in the $300+ price range was 25 percent; by 2010 it escalated to 61 percent. They are enjoying a tremendous growth trajectory with a 78 percent earnings growth year over year in Q4 2010. Apple demonstrated that if designed well, consumers would buy a high-priced phone with a great experience and developers would build applications. They changed the game, and today, Apple owns the high-end range. 

And then, there is Android. In about two years, Android created a platform that attracts application developers, service providers and hardware manufacturers. Android came in at the high-end, they are now winning the mid-range, and quickly they are going downstream to phones under €100. Google has become a gravitational force, drawing much of the industry's innovation to its core. 

Let's not forget about the low-end price range. In 2008, MediaTek supplied complete reference designs for phone chipsets, which enabled manufacturers in the Shenzhen region of China to produce phones at an unbelievable pace. By some accounts, this ecosystem now produces more than one third of the phones sold globally - taking share from us in emerging markets. 

While competitors poured flames on our market share, what happened at Nokia? We fell behind, we missed big trends, and we lost time. At that time, we thought we were making the right decisions; but, with the benefit of hindsight, we now find ourselves years behind. 

The first iPhone shipped in 2007, and we still don't have a product that is close to their experience. Android came on the scene just over 2 years ago, and this week they took our leadership position in smartphone volumes. Unbelievable. 

We have some brilliant sources of innovation inside Nokia, but we are not bringing it to market fast enough. We thought MeeGo would be a platform for winning high-end smartphones. However, at this rate, by the end of 2011, we might have only one MeeGo product in the market. 

At the midrange, we have Symbian. It has proven to be non-competitive in leading markets like North America. Additionally, Symbian is proving to be an increasingly difficult environment in which to develop to meet the continuously expanding consumer requirements, leading to slowness in product development and also creating a disadvantage when we seek to take advantage of new hardware platforms. As a result, if we continue like before, we will get further and further behind, while our competitors advance further and further ahead. 

At the lower-end price range, Chinese OEMs are cranking out a device much faster than, as one Nokia employee said only partially in jest, "the time that it takes us to polish a PowerPoint presentation." They are fast, they are cheap, and they are challenging us. 

And the truly perplexing aspect is that we're not even fighting with the right weapons. We are still too often trying to approach each price range on a device-to-device basis. 

The battle of devices has now become a war of ecosystems, where ecosystems include not only the hardware and software of the device, but developers, applications, ecommerce, advertising, search, social applications, location-based services, unified communications and many other things. Our competitors aren't taking our market share with devices; they are taking our market share with an entire ecosystem. This means we're going to have to decide how we either build, catalyse or join an ecosystem. 

This is one of the decisions we need to make. In the meantime, we've lost market share, we've lost mind share and we've lost time. 

On Tuesday, Standard & Poor's informed that they will put our A long term and A-1 short term ratings on negative credit watch. This is a similar rating action to the one that Moody's took last week. Basically it means that during the next few weeks they will make an analysis of Nokia, and decide on a possible credit rating downgrade. Why are these credit agencies contemplating these changes? Because they are concerned about our competitiveness. 

Consumer preference for Nokia declined worldwide. In the UK, our brand preference has slipped to 20 percent, which is 8 percent lower than last year. That means only 1 out of 5 people in the UK prefer Nokia to other brands. It's also down in the other markets, which are traditionally our strongholds: Russia, Germany, Indonesia, UAE, and on and on and on. 

How did we get to this point? Why did we fall behind when the world around us evolved? 

This is what I have been trying to understand. I believe at least some of it has been due to our attitude inside Nokia. We poured gasoline on our own burning platform. I believe we have lacked accountability and leadership to align and direct the company through these disruptive times. We had a series of misses. We haven't been delivering innovation fast enough. We're not collaborating internally. 

Nokia, our platform is burning. 

We are working on a path forward -- a path to rebuild our market leadership. When we share the new strategy on February 11, it will be a huge effort to transform our company. But, I believe that together, we can face the challenges ahead of us. Together, we can choose to define our future. 

The burning platform, upon which the man found himself, caused the man to shift his behavior, and take a bold and brave step into an uncertain future. He was able to tell his story. Now, we have a great opportunity to do the same. 

Stephen.


Monday, December 27, 2010

Changing the positive & negetive softkeys


Qt menu bar has two menu items, as you would have seen by default left side of the key is “Options” and the right side is “Exit”.
Today we shall see how to change the text of it.
The left key is “Positive Soft key” & the right key is “Negative soft key”. We need to create an action with the positive and negative soft key role and insert to the window, so the keys will get changed.
Ex: For positive soft key:(Left side key)

QAction* Newkey = new QAction("New", this);
Newkey->setSoftKeyRole(QAction::PositiveSoftKey);
this->addAction(Newkey);


Negative soft key: (Right side key)
QAction* close = new QAction("close", this);
close->setSoftKeyRole(QAction::NegativeSoftKey);
this->addAction(close);


Here is the sample code, just put these files in a sample application and run for the results

.cpp file

#include "QT_Softkeys.h"
#include <qmessagebox.h>

QT_Softkeys::QT_Softkeys(QWidget *parent)
    : QMainWindow(parent)
{
        //ui.setupUi(this);
        
    
        QAction* Newkey = new QAction("New", this);
        Newkey->setSoftKeyRole(QAction::PositiveSoftKey);
        this->addAction(Newkey);
        
        QAction* close = new QAction("close", this);
        close->setSoftKeyRole(QAction::NegativeSoftKey);
        connect(close,SIGNAL(triggered()),this,SLOT(closeClickked()));
        this->addAction(close);
                       
        
}

QT_Softkeys::~QT_Softkeys()
{

}

void QT_Softkeys::closeClickked()
        {
        QMessageBox::information(this,"Hi","Hi we r closing");
        QApplication::quit();
        }


Header file

#ifndef QT_SOFTKEYS_H
#define QT_SOFTKEYS_H

#include <QtGui/QMainWindow>
#include "ui_QT_Softkeys.h"

class QT_Softkeys : public QMainWindow
{
    Q_OBJECT

public:
        QT_Softkeys(QWidget *parent = 0);
    ~QT_Softkeys();
    
    public slots:
    void closeClickked();

private:
    Ui::QT_Softkeys ui;
};

#endif // QT_SOFTKEYS_H


Sunday, October 10, 2010

Localization in QT


Some instructions need to be followed in performing localization in Qt

Instructions:

1)Add tr macro for all the QString assignment.
2)Assigning the string to Non Qt objects pointer use QT_TRANSLATE_NOOP macro.
3)Assigning the string to Non Qt objects in some function use QT_NOOP macro.

Here are some samples,which shows how to add strings for Localization compatible.

Syntax to be used for global char*.

const char* TestStr = QT_TRANSLATE_NOOP("StringList","Welcome To Qt");
QPushButton *pushBtn = new QPushButton(qApp->translate("StringList",TestStr));

For Qstring Objects.

QString UIstr = QObject::tr("Qt is a Framework");
QPushButton *pushBtn = new QPushButton(tr(UIstr));

For local char*.

const char * text = QT_TR_NOOP("Qt framework rocks");
QPushButton *pushBtn = new QPushButton(tr(text));


Steps needs to be followed in generation and usage of localized file in application.
1)Add the TRANSLATION Macro in the .pro file and save.

example:
TRANSLATIONS += superapp_fr.ts\
TRANSLATIONS += superapp_jp.ts

like this, add all possible language translation file you need.
2)Use lupdate command in Qt Command prompt to generate the .ts file and .ts file will be in your project folder.

 
3)  Open the .ts file in Qt linguist tool and add the mapping strings.   
     Launch Qt Linguist From Start Menu
    

 Adding mapping strings to the English equivalent strings.


4)Similar to step2 use lrelease to generate the .qm file and .qm file will be in your project folder.

5)Copy .qm file and place it in desired location and load it on launching the application.


Here how the loading part of code looks.

QTranslator translator;
translator.load("c:\\Data\\MyStrings_fr");
a.installTranslator(&translator);


Sunday, August 29, 2010

Smart installer for The Symbian applications.


Smart installer for The Symbian applications.

This post describes in brief what smart installer is, and why it is essential for the Symbian applications.

How will you run the Symbian applications in a phone which doesn’t have Qt SDK installed?
To overcome this problem Nokia has provided the simple solution i.e the Smart installer.

Smart installer is pre embedded in your .sis file, when you download an application from the OVI store, first the smart installer checks, weather the Qt is installed in your phone, if not it will download the latest Qt from the Nokia server and install to the phone. application gets installed in the post installation phase. This is how it works.

Please Note: If you are using the Carbide editor for Symbian application development, then smart installer doesn’t work. To make smart installer you need to have the Nokia QT SDK only.

Requirements:
Nokia QT SDK. Download link
Certificates for the Signed .sis file.


How to make the Signed smart installer for the OVI store.


1)    Launch Nokia Qt SDK command prompt.
       

2)    Go to application Directory,
3)    qmake
4)    make release-gcce

To sign the application, you can put the certificates in the current directory or you can refer it from the other drive also. If you are referring from the other drive please mention the Path properly.

 5) make sis QT_SIS_CERTIFICATE=publisherid.cer  QT_SIS_KEY=publisherid.key
 This will generate  signed sis file


 6) make installer_sis QT_SIS_CERTIFICATE=publisherid.cer  QT_SIS_KEY=publisherid.key
 This will generate  smart installer signed sis file.


Follow up these steps for the self self-signed Smart Installer package.

1)qmake

2)make release-gcce
Simple SIS file.

3)make installer_sis
Smart installer SIS file

more information about Qt smart installer can be found here
http://doc.qt.nokia.com/smart-installer-1.0/index.html

Sunday, July 25, 2010

How to customize Listview in Qt using Delegates.


By default listview in Qt takes a text and an icon. What if you want a Listview with more then one icon, what if you want listview with more then one text or both? To come up from this problem, Qt has concept called Delegates.

Before knowing about Delegates, first we shall see the model and view concept in Qt.

What is model and view class?
Model class is responsible for storing the data, view class is responsible for showing data.
Model and view can be separated, they are independent.

Listview in Qt:
Listview in Qt takes model and view class, first data should be filled in the model class and you need to tell view to show data, but how the data present in model should be displayed in view?
The answer is Delegates, delegates tell where and how the data should be displayed in view.

Sample inbox example, shows how to use delegate in Qt
The Requirement is displaying a image, One bigger text and a sub-text of small size.

To make delegate class, you need to override couple of functions,
sizeHint(const QStyleOptionViewItem & option ,
const QModelIndex & index) const

sizeHint return you the item width. Which can be either predefined or you can calculate it using the data elements.

paint(QPainter *painter, const QStyleOptionViewItem &option,
const QModelIndex &index) const

In paint you need to tell, how and were data should be displayed in view. i.e, where image should be displayed, where the text should come and the size of the text.

here how the delegate cpp and header file looks.
/*
 * ListviewDelegate.cpp
 *
 *  Created on: Jul 17, 2010
 *      Author: http://qt-articles.blogspot.com
 */

#include "ListviewDelegate.h"

ListviewDelegate::ListviewDelegate()
    {
    // TODO Auto-generated constructor stub

    }

ListviewDelegate::~ListviewDelegate()
    {
    // TODO Auto-generated destructor stub
    }

//alocate each item size in listview.
QSize ListviewDelegate::sizeHint(const QStyleOptionViewItem &  option ,
                              const QModelIndex & index) const
{
    QIcon icon = qvariant_cast<QIcon>(index.data(IconRole));
    QSize iconsize = icon.actualSize(option.decorationSize);
    QFont font = QApplication::font();
    QFontMetrics fm(font);
    
    return(QSize(iconsize.width(),iconsize.height()+fm.height() +8 ));

}
void ListviewDelegate::paint(QPainter *painter, const QStyleOptionViewItem &option,
                           const QModelIndex &index) const
 {
    QStyledItemDelegate::paint(painter,option,index);
    
    painter->save();
    
    QFont font = QApplication::font();
    QFont SubFont = QApplication::font();
    //font.setPixelSize(font.weight()+);
    font.setBold(true);
    SubFont.setWeight(SubFont.weight()-2);
    QFontMetrics fm(font);
    
    QIcon icon = qvariant_cast<QIcon>(index.data(IconRole));
    QString headerText = qvariant_cast<QString>(index.data(headerTextRole));
    QString subText = qvariant_cast<QString>(index.data(subHeaderTextrole));
    
    QSize iconsize = icon.actualSize(option.decorationSize);
    
    QRect headerRect = option.rect;
    QRect subheaderRect = option.rect;
    QRect iconRect = subheaderRect;
    
    iconRect.setRight(iconsize.width()+30);
    iconRect.setTop(iconRect.top()+5);
    headerRect.setLeft(iconRect.right());
    subheaderRect.setLeft(iconRect.right());
    headerRect.setTop(headerRect.top()+5);
    headerRect.setBottom(headerRect.top()+fm.height());
    
    subheaderRect.setTop(headerRect.bottom()+2);
    
    
    //painter->drawPixmap(QPoint(iconRect.right()/2,iconRect.top()/2),icon.pixmap(iconsize.width(),iconsize.height()));
    painter->drawPixmap(QPoint(iconRect.left()+iconsize.width()/2+2,iconRect.top()+iconsize.height()/2+3),icon.pixmap(iconsize.width(),iconsize.height()));
    
    painter->setFont(font);
    painter->drawText(headerRect,headerText);
    
    
    painter->setFont(SubFont);
    painter->drawText(subheaderRect.left(),subheaderRect.top()+17,subText);
    
    painter->restore();
    
 }


/*
 * ListviewDelegate.h
 *
 *  Created on: Jul 17, 2010
 *      Author: http://qt-articles.blogspot.com
 */

#ifndef ListviewDelegate_H_
#define ListviewDelegate_H_
#include <QtGui>

class ListviewDelegate : public QStyledItemDelegate
    {
public:
    ListviewDelegate();
    virtual ~ListviewDelegate();
    
    enum datarole {headerTextRole = Qt::UserRole + 100,subHeaderTextrole = Qt::UserRole+101,IconRole = Qt::UserRole+102};
    
    void paint(QPainter *painter, const QStyleOptionViewItem &option,
               const QModelIndex &index) const;

    QSize sizeHint(const QStyleOptionViewItem &option,
                   const QModelIndex &index ) const;

    };

#endif /* ListviewDelegate_H_ */


How to connect Model,view and Delegates in Listview.

 QListView *view;
 QStandardItemModel *model;
 ListviewDelegate *listdelegate;
       
 view = new QListView();
 model = new QStandardItemModel();
 listdelegate = new ListviewDelegate();
           
  view->setItemDelegate(listdelegate); //connect the delegate to view
  view->setModel(model);//connect the model to view.


How to insert an item to model,
QStandardItem *item = new QStandardItem();
           QIcon icon(":/new/prefix1/about.png");
           
           item->setData("Inbox",ListviewDelegate::headerTextRole);
           item->setData("10 Messages",ListviewDelegate::subHeaderTextrole);
           item->setData(icon,ListviewDelegate::IconRole);
           model->appendRow(item);


This is how the entire code of inserting item to view looks


//http://qt-articles.blogspot.com
#include "ListDeligates.h"  
 #include <QtGui>  
 #include <QApplication>  
 #include "ListviewDelegate.h"  
 int main(int argc, char *argv[])  
 {  
   QApplication a(argc, argv);  
   QListView *view;  
   QStandardItemModel *model;  
   ListviewDelegate *listdelegate;  
   view = new QListView();  
   model = new QStandardItemModel();  
   listdelegate = new ListviewDelegate();  
   view->setItemDelegate(listdelegate);  
   view->setModel(model);  
          QStandardItem *item = new QStandardItem();  
          QIcon icon(":/new/prefix1/about.png");  
          item->setData("Inbox",ListviewDelegate::headerTextRole);  
          item->setData("10 Messages",ListviewDelegate::subHeaderTextrole);  
          item->setData(icon,ListviewDelegate::IconRole);  
          model->appendRow(item);  
          QStandardItem *item1 = new QStandardItem();  
          item1->setData("Draft",ListviewDelegate::headerTextRole);  
          item1->setData("5 Messages",ListviewDelegate::subHeaderTextrole);  
          item1->setData(icon,ListviewDelegate::IconRole);  
          item1->setEditable(false);  
          model->appendRow(item1);  
          QStandardItem *item2 = new QStandardItem();  
      item2->setData("Sent Items",ListviewDelegate::headerTextRole);  
      item2->setData("5 Messages",ListviewDelegate::subHeaderTextrole);  
      item2->setData(icon,ListviewDelegate::IconRole);  
      item2->setEditable(false);  
      model->appendRow(item2);  
      QStandardItem *item3 = new QStandardItem();  
      item3->setData("Message Settings",ListviewDelegate::headerTextRole);  
      item3->setData("",ListviewDelegate::subHeaderTextrole);  
      item3->setData(icon,ListviewDelegate::IconRole);  
      item3->setEditable(false);  
      model->appendRow(item3);  
      QStandardItem *item4 = new QStandardItem();  
      item4->setData("Delivery Reports",ListviewDelegate::headerTextRole);  
      item4->setData("",ListviewDelegate::subHeaderTextrole);  
      item4->setData(icon,ListviewDelegate::IconRole);  
      item4->setEditable(false);  
           model->appendRow(item4);  
     view->showMaximized();  
     return a.exec();  
 }  

Here is the output


Sunday, June 13, 2010

How to add stylesheet for button in Qt


Here i am showing, how to set the button background color from stylesheet.

CustomButton *pushButton = new CustomButton();
pushButton->setStyleSheet(QString::fromUtf8("background-color: rgb(255, 255, 0);"));


How to set background image for button using stylesheet.

CustomButton *pushButton = new CustomButton();
pushButton_2->setStyleSheet(QString::fromUtf8("background-image: url(:/new/prefix1/icon/Smiley.bmp);"));


if you are using Qt GUI for designing, follow up these steps.


How to customize the Button in Qt


In this article,we will see how to customize button.

Qt has provided the option to place any number of Texts and images at desired location over a button, but now i am showing how to place 3 Text and 1 image over a button.

First we need to subclass the Qpushbutton, then override the paintEvent() method. In the paint event method perform the drawing Text, images etc..

sample code is provided here..

//Custom button class
//Qt-articles.blogspot.com

class CustomButton : public QPushButton
{
Q_OBJECT

public:
CustomButton(QWidget *parent = 0);
~CustomButton();

public:
QString FirstName,MiddleName,Lastname;
QImage SimileIcon;
bool IsBkColorEnabled;
QColor Bkclor;

protected:
void paintEvent(QPaintEvent *);

};


//Custom button implimentation file
//Qt-articles.blogspot.com
CustomButton::CustomButton(QWidget *parent)
: QPushButton(parent)
{

}

CustomButton::~CustomButton()
{

}
//Paint event of button
void CustomButton::paintEvent(QPaintEvent *paint)
{
QPushButton::paintEvent(paint);
QPainter p(this);
p.save();

p.drawText(QPoint(100,100),FirstName); //Simple Text.
p.setPen(Qt::blue); //changing the color of pen.
p.setFont(QFont("Arial", 30)); //Changing the font.
p.drawText(QPoint(100,200),MiddleName);
p.drawText(QPoint(100,300),Lastname);
p.drawImage(QPoint(300,300),SimileIcon);
p.restore();
}


How to Add Resources to Project in Qt


Its very simple, follow up these steps.

Create new Qrc file.


New Qrc file looks like this


Add the file to Qrc.


using the Resource file in project.

 ":/new/prefix1/icon/Smiley.bmp"

for example,

QIcon icon;
icon.load(":/new/prefix1/icon/Smiley.bmp");

Note:- Prefix of icon can be changed to your wish.